
. . .revitalization program ordered by t. . .
Reports from the battle front have come in recently and we are sad to report that Captain Shadowmax has suffered a defeat at the hands of Admiral Bonner. This defeat will cause harsher standards of living for those living on Mon Calamari who rely on the Minntoonie system for supplies.
Captain Shadowmax was running the blockade of the Minntoonite Spur to bring much needed food and medical supplies to the residents of Mon Calamari.
Due to this unfortunate turn of events we at Alliance Free News are sad to say that through this unjustifiable blockade by the Imperial Navy will cause the deaths of younglings. Their cold and hungry forms will be in our minds and we hope they will be in yours.
We will inform you further on this situation as more news becomes available. We hope that another member of the Alliance will attempt the run for all those young ones.
The "Lucky Jack" got off a good first volley, but to no avail. The Vic II brought down the side shields with a devastating medium range shot, and followed up with shots from the other Vic I's, left the Rebel Flagship down to 3 hull.
Alliance Free News interrupts your standard Imperial propaganda to bring you this story.
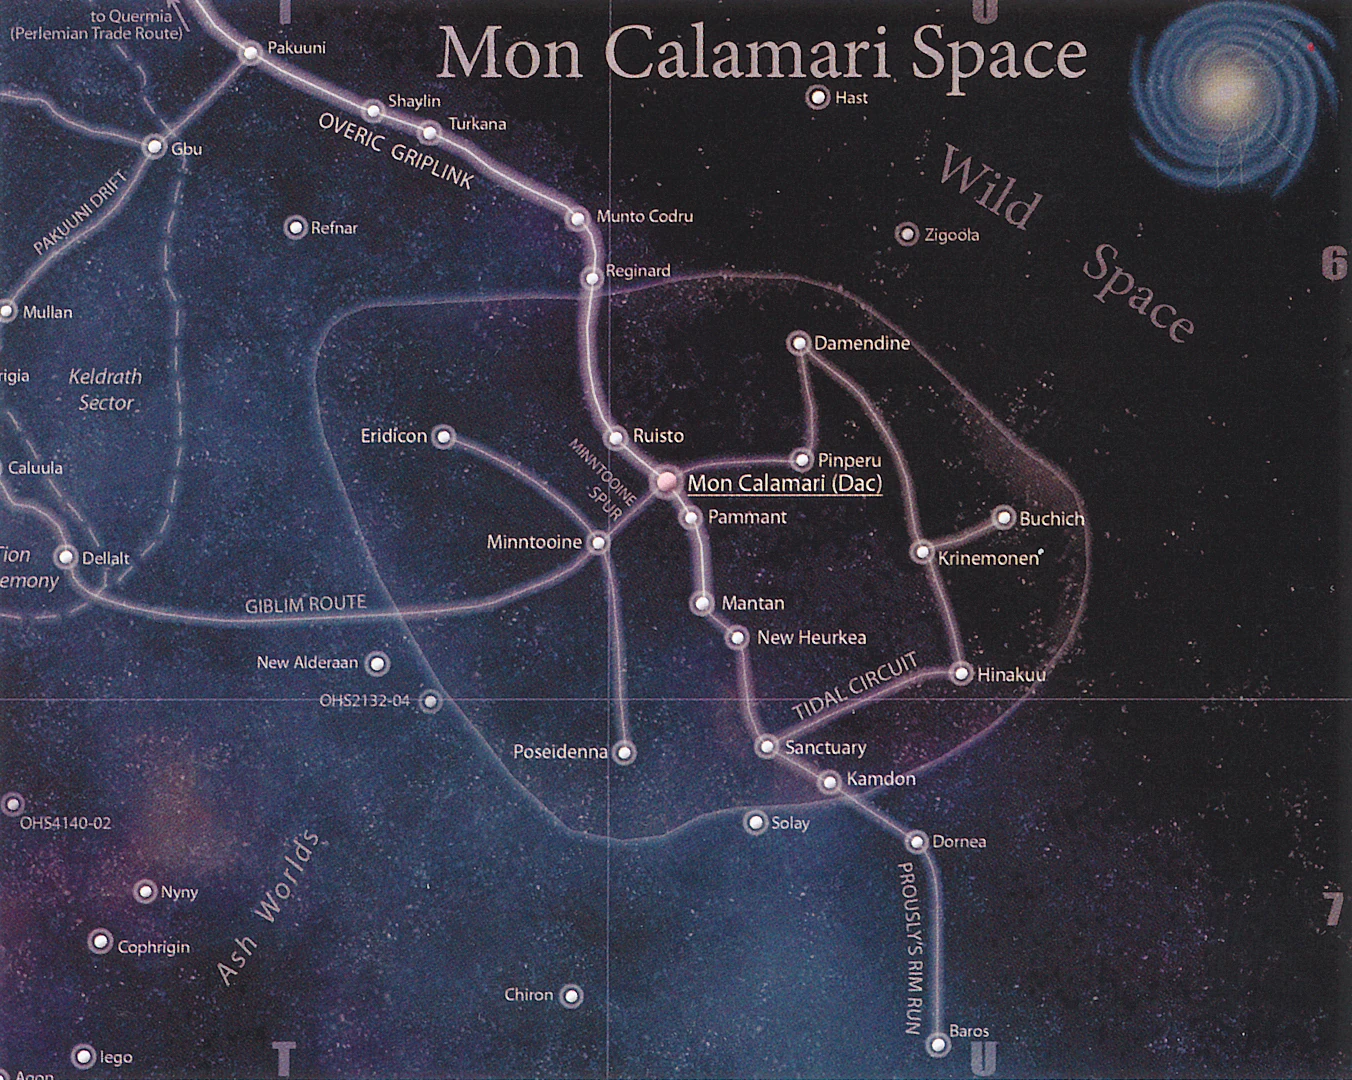 |
| Combat occurred along the Minntoonie Spur |
Captain Shadowmax was running the blockade of the Minntoonite Spur to bring much needed food and medical supplies to the residents of Mon Calamari.
Due to this unfortunate turn of events we at Alliance Free News are sad to say that through this unjustifiable blockade by the Imperial Navy will cause the deaths of younglings. Their cold and hungry forms will be in our minds and we hope they will be in yours.
We will inform you further on this situation as more news becomes available. We hope that another member of the Alliance will attempt the run for all those young ones.
This is Alliance Free News the voice of the Rebellion signing off.
. . . recapture the Shayling and Turkana systems within the com. . .
System: Eridicon
WINNER: Admiral Bonner (Empire)
POINTS: 400
OBJECTIVE: Advanced Gunnery
WINNER: Admiral Bonner (Empire)
POINTS: 400
OBJECTIVE: Advanced Gunnery
400pts REBELS: Captain Shadowmax
Assault Frigate Mark IIB (the Lucky Jack)
Assault Frigate Mark IIB (the Lucky Jack)
General Dodonna
Gunnery Teams
Adv Proj,
Enhanced Armaments
Assault Frigate Mark IIB (the Greasy Bastard)
Yavaris
Raymus Antillies
Squadrons:
Keyan Farlander
B-Wing Squadron
B-Wing Squadron
Luke Sykwalker
X-Wing Squadron
X-Wing Squadron
Tycho Celcho
A-Wing Squadron
398pts EMPIRE: Admiral Bonner
Victory II-class Star Destroyer
Grand Moff Tarkin
Intel Officer
Victory I-class Star Destroyer
Wulf Yularen
Flight Controllers
Expanded Hanger Bay
Vic I
Weapons Liaison Squadrons:
Darth VaderTIE Advanced Squadron
TIE Advanced Squadron
Soontir FelTIE Interceptor
TIE Interceptor
Major Rhymer
From Captain Shadowmax's notes on the battle:
The battle opened with all 3 Vics approaching along an angled vector 3 abreast, with the Flagship "Slasher" on the left flank.
The Rebs moved on an intercept course to try and cut off one of the Vic I's from getting around the right side. Before long, Capt Shadowmax discovered they had been drawn into a trap.(And the Rum was now gone....why is the Rum always gone?)
Assault Frigate Mark IIB (the Greasy Bastard)
Gunnery Teams
Adv Proj,
Enhanced Armaments
Nebulon-B Escort Yavaris
Raymus Antillies
Squadrons:
Keyan Farlander
B-Wing Squadron
B-Wing Squadron
Luke Sykwalker
X-Wing Squadron
X-Wing Squadron
Tycho Celcho
A-Wing Squadron
398pts EMPIRE: Admiral Bonner
Victory II-class Star Destroyer
Grand Moff Tarkin
Intel Officer
Victory I-class Star Destroyer
Wulf Yularen
Flight Controllers
Expanded Hanger Bay
Vic I
Weapons Liaison Squadrons:
Darth VaderTIE Advanced Squadron
TIE Advanced Squadron
Soontir FelTIE Interceptor
TIE Interceptor
Major Rhymer
From Captain Shadowmax's notes on the battle:
The battle opened with all 3 Vics approaching along an angled vector 3 abreast, with the Flagship "Slasher" on the left flank.
The Rebs moved on an intercept course to try and cut off one of the Vic I's from getting around the right side. Before long, Capt Shadowmax discovered they had been drawn into a trap.(And the Rum was now gone....why is the Rum always gone?)
The "Lucky Jack" got off a good first volley, but to no avail. The Vic II brought down the side shields with a devastating medium range shot, and followed up with shots from the other Vic I's, left the Rebel Flagship down to 3 hull.
The rest of the Rebel fleet managed to cut down one of the Vic I's with bwings and Skywalker. However Adm Bonners Rymer Ball destroyed "the Lucky Jack", forcing the other rebels ships to retreat. I guess we won't be getting through this blockade !!!....
The Rebel fleet picked up Capt Shadowmax floating in one of the escape pods from his vaporized Flagship where he managed to find......you guessed it....the last stashed bottle of Rum......(defeat isn't so bad when one has Rum)
Empire Victory
Mordy(Shadowmax)
Empire Victory
Mordy(Shadowmax)
No comments:
Post a Comment