Showing posts with label Tactic. Show all posts

Friday, October 23, 2015

Alliance forces routed in relief efforts for Mon Calamari

. . .revitalization program ordered by t. . . 


Alliance Free News interrupts your standard Imperial propaganda to bring you this story. 
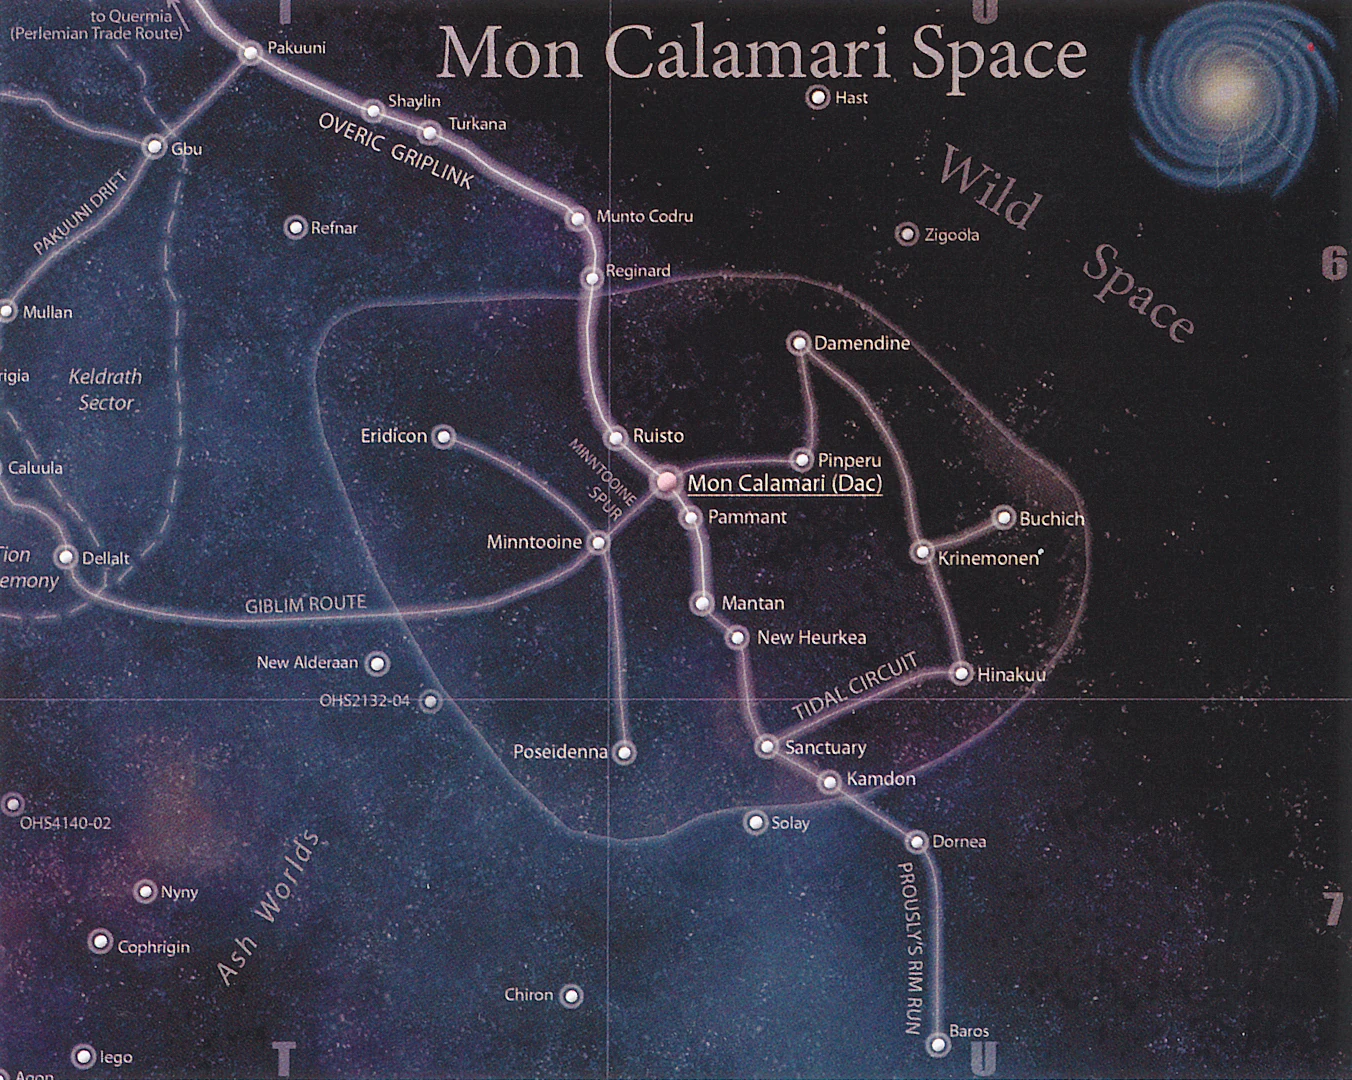
Combat occurred along the Minntoonie Spur
Reports from the battle front have come in recently and we are sad to report that Captain Shadowmax has suffered a defeat at the hands of Admiral Bonner. This defeat will cause harsher standards of living for those living on Mon Calamari who rely on the Minntoonie system for supplies.

Captain Shadowmax was running the blockade of the Minntoonite Spur to bring much needed food and medical supplies to the residents of Mon Calamari. 

Due to this unfortunate turn of events we at Alliance Free News are sad to say that through this unjustifiable blockade by the Imperial Navy will cause the deaths of younglings. Their cold and hungry forms will be in our minds and we hope they will be in yours.

We will inform you further on this situation as more news becomes available. We hope that another member of the Alliance will attempt the run for all those young ones. 

This is Alliance Free News the voice of the Rebellion signing off.


. . . recapture the Shayling and Turkana systems within the com. . .


System: Eridicon
WINNER: Admiral Bonner (Empire)
POINTS: 400
OBJECTIVE: Advanced Gunnery

400pts REBELS: Captain Shadowmax

Assault Frigate Mark IIB (the Lucky Jack)
     General Dodonna
     Gunnery Teams
     Adv Proj,
     Enhanced Armaments

Assault Frigate Mark IIB (the Greasy Bastard)

     Gunnery Teams
     Adv Proj,
     Enhanced Armaments

Nebulon-B Escort 
     Yavaris
     Raymus Antillies

Squadrons:
Keyan Farlander

B-Wing Squadron
B-Wing Squadron
Luke Sykwalker

X-Wing Squadron
X-Wing Squadron
Tycho Celcho
A-Wing Squadron
398pts EMPIRE: Admiral Bonner


Victory II-class Star Destroyer

     Grand Moff Tarkin
     Intel Officer

Victory I-class Star Destroyer

     Wulf Yularen
     Flight Controllers
     Expanded  Hanger Bay

Vic I 

     Weapons Liaison Squadrons:
Darth VaderTIE Advanced Squadron

TIE Advanced Squadron
Soontir Fel
TIE Interceptor

TIE Interceptor
Major Rhymer


From Captain Shadowmax's notes on the battle:

The battle opened with all 3 Vics approaching along an angled vector 3 abreast, with the Flagship "Slasher" on the left flank.

The Rebs moved on an intercept course to try and cut off one of the Vic I's from getting around the right side. Before long, Capt Shadowmax discovered they had been drawn into a trap.(And the Rum was now gone....why is the Rum always gone?)

The "Lucky Jack" got off a good first volley, but to no avail. The Vic II brought down the side shields with a devastating medium range shot, and followed up with shots from the other Vic I's, left the Rebel Flagship down to 3 hull.

The rest of the Rebel fleet managed to cut down one of the Vic I's with bwings and Skywalker. However Adm Bonners Rymer Ball destroyed "the Lucky Jack", forcing the other rebels ships to retreat. I guess we won't be getting through this blockade !!!....

The Rebel fleet picked up Capt Shadowmax floating in one of the escape pods from his vaporized Flagship where he managed to find......you guessed it....the last stashed bottle of Rum......(defeat isn't so bad when one has Rum) 

Empire Victory

Mordy(Shadowmax)

Saturday, October 17, 2015

Imperial war engine grinding to a halt in the Dellalt system

. . . Imperial Navy probed Rebel lines. . . 

Alliance Free News interrupts your standard Imperial propaganda to bring you this story. 

Destruction of an Imperial Star Destroyer at the hands
of the combined firepower of the Blue Fleet
News from the Dellalt system has come in from one of our reporters on the flagship of Admiral Akbar who was overseeing Commander Lyraues's efforts and pushing the Imperial warmongers out of the Mon Calamari sector, one system at a time. 

Through the expert teachings of Admiral Akbar, Commander Lyraeus was able to dispatch not one but two Imperial Class Star Destroyers commanded by Commodore Ozzel. The battle had little casualties for our brave combatants in the Blue Fleet. 


While Commodore Ozzel's use of the aggressive Tarkin philosophy failed him in this battle, we have heard that he is being promoted to the position of Admiral of Darth Vader's "Death Squadron". We hope that his ineptitude continues to favor our cause in the future and wish the good Commodore luck and long life in his new position.


With the combat growing fiercer in the sector,we hope to bring you more news from the front lines. 


This is Alliance Free News the voice of the Rebellion signing off. 

. . . commission at the head of Lord Vader's personal squadron of star destroyers. . . 


HNN Article: Empire Gathers Valuable Intelligence on Mon Calamari Forces

System: Dellalt
WINNER: Lyraeus (Rebels)
POINTS: 400
OBJECTIVE: Advanced Gunnery

398pts IMPERIALS: Mikael (First Player)

Imperial II-class Star Destroyer (Objective ship)
     Admiral Ozzel
     Phylon Q7 Tractor Beams

Imperial I-class Star Destroyer 
     Engineering Captain
     Phylon Q7 Tractor Beams
     Devastator

Imperial Raider: Raider II-class Corvette (48)

Squadrons:
"Howlrunner"
Tie Fighter Squadron
Tie Fighter Squadron 

398pts REBELS: Commander Lyraeus (Second Player)

MC80 Assault Cruiser (Blue Citadel - Objective Ship)
     Advanced Projectors
     Electronic Countermeasures
     XI7 Turbolasers 
     •Admiral Ackbar
     •Home One 

Assault Frigate Mark IIB (Blue Majesty)
     Advanced Projectors
     Gunnery Team
     XI7 Turbolasers

Assault Frigate Mark IIB (Scars of Freedom) 
     Advanced Projectors
     Gunnery Team 
     XI7 Turbolasers

Squadrons:
Tycho Celchu (Riuka Nadori) - Lightning Squadron
A-Wing - Tornado Squadron
A-Wing - Barracuda Squadron 

This game was a fun for me in all honesty. I was intimidated because Mikael was bringing two Imperial Star Destroyers to the fight and the last time I had faced one of those I was destroyed horrendously. 

So we flipped for who would get to pick for initiative since we were tied (Mikael usually likes maxing points so this usually does not happen). Mikael won the flip and decided to go First and he choose my Advanced Gunnery. . . Immediately I was suspect of him but at the same time really elated. Of course I chose my Assault Cruiser to be the objective ship because shooting 6 red dice out of my side arc twice is always a great thing. I will say, Advanced Gunnery is ALWAYS a good choice for the MC80 even if you are first player because that HUGE side arc can usually see two hull zones on the same ship. 

So Turn 1 is going on and I have engineering commands for all my ships, I have decided to deploy them all horizontal to the table edge and going speed 2. Since Mikael had the Tractor Beams I really could not care less about them though. The plan was to stick as speed 2 and let the ISD's come to me. 

This planned worked well actually. Mikael started his ISD's at speed 1 and the Raider at 4. At turn 2 he got aggressive and usedused Ozzel to jump to speed 3 with the ISD's which brought the Devastator into all the firepower of my fleet.!. .  and it was then destroyed. . .  Ozzel is living up to his reputation. The Raider got nicked by the side of of the Assault Cruiser and wilted under its amazing close range firepower. . .  

My squadrons really did nothing this game and just hid in asteroids to negate the Swarm bonuses. Worked like a charm though I think I did lose one of them towards the end of the game. 

The last ISD survived till the end which had me worried because my lead Assault Frigate (Scars of Freedom) got to the point where damage was starting to be dealt to it and was even dammed by the remaining ISD. . . Sadly XI7 Turbolasers proved their weight in points several times over this game against both ISD's and it went down at last at turn 5.


Thursday, September 24, 2015

Rebel training operations

. . .sing the advantage after the. . . 

Alliance Free News interrupts your standard Imperial propaganda to bring you this story. 

To combat the heinous threat of the Empire the  commanders of the Alliance have conducted combat training for their fleets. Commander Lyraeus conducted one such exercise with Captain Iskandar's fleet. 

During the exercise, the B-Wing squadrons of Commander Lyraeus's fleet were able to "damage" and engage the Y-Wings of Captain Iskandar's fleet as well as cripple a hull zone of Iskandar's secondary Assault Frigate . 

Minamal damage was dealt to the forces of Commander Lyraeus though he did have to recall several squadrons who were "lost" in the exercise. 

While the combat was hot, Captain Iskandar had chose to delay his engagement by coming in from hyperspace at the far side of the "engagement zone". This allowed Commander Lyraeus to position his suqadron screen and get the first strike onto Captain Iskandar's secondary Assault Frigate.

At the end of the exercise, both of Commander Lyraeus's ships were still in good fighting form while the secondary Assault Frigate from Captain Iskandar was forced to leave the exercise due to simulated destruction.

AFN was able to get a comment from the good Captain. 
         "While the exercise did not go in my favor, I was able to learn much from the Commander and look forward to conducting future exercises to hone my skills as a fleet officer."

This is Alliance Free News the voice of the Rebellion signing off. 

. . .lenient on the wayward Mon Calamari. . . 

System: Unknown
WINNER: Lyraeus (Rebels)
POINTS: 300
OBJECTIVE: Minefields 

299pts REBELS: Captain Iskandar
Assault Frigate mkii B (Bentley Priory)
     Garm Bel Iblis
     Weapons Liaison 
     Gunnery Team
     Advanced Projectors
     Enhanced Armaments

Assault Frigate mkii B (unnamed) *
     Weapons Liaison 
     Gunnery Team
     Advanced Projectors
     Enhanced Armaments

Squadrons:
Tycho Celchu *
A-Wing *
A-Wing *
Y-Wing 
Y-Wing 
Y-Wing 
Y-Wing

299pts REBELS: Commander Lyraeus 
Assault Frigate mkii B (Blue Majesty)
     Garm Bel Iblis
     Gunnery Team
     Advanced Projectors
     Enhanced Armaments

Assault Frigate mkii B (Scars of Freedom)
     Weapons Liaison 
     Gunnery Team
     Advanced Projectors
     Enhanced Armaments

Squadrons:
A-Wing *
A-Wing *
B-Wing
B-Wing *
B-Wing
B-Wing

Saturday, September 19, 2015

Staggering skirmish in the Mullan System

. . . Rebel activity in the Caluula system. . .


Alliance Free News interrupts this heinous Imperial propaganda broadcast to bring you 

We have been brought stunning news from the front lines of the struggle for freedom. We have been informed that Captain Shadowmax has destroyed an Imperial task force in the Mullan system. 

The reports indicate that while the Carrier Assault Frigate attached to Captain Shadowmax's combat group did take a beating from the Imperial task force, it was able to limp away from the combat. The rest of the combat group was then able to decimate the Imperial task force that included the flagship of the known Admiral Ricktus. 

While we have confirmed, that Admiral Ricktus was able to get his flagship out of the battle and into dry dock, we do know that it will be several months of repair work to be in any operational condition. 

This is a momentous victory for the Alliance. Destroying three of the Empire's  "Star Destroyers" is a victory that will be talked about for years to come and will help in the fight to end the tyranny of the Empire.

We will bring more information on this as we get more news from the front. 

This is Alliance Free News the voice of the Rebellion signing off. 


. . .reporting done by the Rebellion's mouthpiece. . .

System: Mullan
WINNER: Rebels
POINTS: 400 
OBJECTIVE: Hyperspace Assault

396pts EMPIRE: Richard 

Victory II-class Star Destroyer
     Admiral Screed
     Intel Officer
     H9-Turbolasers
     Warlord

Victory I-class Star Destroyer
     Intel Officer
     Assault Concussion Missions

Victory I-class Star Destroyer
     Intel Officer
     Assault Concussion Missions

Gladiator I-class Star Destroyer
     Wulff Yularen
     Engine Techs
     Assault Concussion Missions
     Demolisher


397pts REBELS: Captain Shadowmax

Assault Frigate mkii A (Lucky Jack)
     General Dodonna
     Raymus Antillies
     Gunnery Team
     Advanced Projectors
     Enhanced Armaments

Assault Frigate mkii B
     Adar Tallon
     Flight Controller
     Expanded Hanger Bay
     Advanced Projectors

CR90 B
     Dodonna's Pride
     Nav Team

CR90 A
     Jaina's Light
     Leia Organa

Luke Skywalker
Tycho Celchu
A-Wing
A-Wing
A-Wing
     

Sunday, September 13, 2015

Flare up in the Caluula System

. . .Rebel advances in the Gbu syste. . . 

Alliance Free News interrupts this Imperial propaganda to bring you important news. 


Gladiator Star Destroyers moving in for the attack
We have reports of a conflict between Commander Lyraeus in the Caluula system. During a blockade run to bring much needed supplies from interested parties to the Mon Calamari system, Commander Lyraeus encountered several Imperial Gladiator Star Destroyers that were beleaguering the trading station in the area. 

We have reports that Commander Lyraeus was able to fend off the Imperials attacks through the use of his flagship Blue Majesty and her sister ship Scars of Freedom. These two modified Assault Frigate mkii B's were backed up by two squadrons of A-Wings, and four squadrons of Y-Wings. 

There was fierce battles around the station that was surrounded by asteroids and debris fields. Riuka Nadori led Lightning Squadron, made up of A-Wings, to assist the host of Y-Wings in damaging the Imperial flagship as well as injuring the Gladiator known as the Demolisher. Scars of Freedom suffered some damage causing it to leave the battle when the Imperial forces retreated. 

Due to the heroic efforts of the this task force, the Imperial forces in the area were forced to retreat with severe hull damage and blown shield projectors, This is a tremendous victory for the Alliance as it takes these dangerous Imperial forces off the front lines. This loss of battle ready ships for the Imperial forces will erode their control of the sector. 

We will bring more information on this as we get more news from the front. 

This is Alliance Free News the voice of the Rebellion signing off. 

. . . he Veubgri, are deemed ideal for hard labor. . . 

System: Caluula 
WINNER: Rebels
POINTS: 300 
OBJECTIVE: Contested outpost

300 pts EMPIRE: Henry 
Gladiator I-class Star Destroyer
     Grand Moff Tarkin
     Expanded Launchers
     Sensor Team
     Engine Techs
Gladiator I-class Star Destroyer
     Weapon Liaison
     Expanded Launchers
     Sensor Team
     Engine Techs
     Demolisher
Gladiator I-class Star Destroyer
     Weapon Liaison
     Expanded Launchers
     Sensor Team
     Engine Techs

296 pts REBELS: Damion  

Assault Frigate mkii B (Blue Majesty)
     Garm Bel Iblis
     Intel Officer
     Gunnery Team
     Advanced Projectors
     Enhanced Armaments
     
Assault Frigate mkii B (Scars of Freedom)
     Intel Officer
     Gunnery Team
     Advanced Projectors
     Enhanced Armaments

Tycho Celchu (Riuka Nadori) - Lightning Squadron
A-Wing - Tornado Squadron
Y-Wing - Amber Squadron
Y-Wing - Cobalt Squadron
Y-Wing - Deep Squadron
Y-Wing - Storm Squadron


Thursday, July 23, 2015

Conflagration in the Nelvaan syetem

. . .  plete and strategically unsuited for the New Or. . .  

Alliance Free News interrupts this Imperial propaganda with news of combat in the Nelvaan system. 

Recently there was a conflict between two Imperial Victory Star Destroyers and their associated squadrons in the process of looting a trading station in the Nelvaan trade lanes. 

Two Assault Frigates and a Nebulon-B Escort Frigate responded to this outrageous act against the people of the Nelvaan system. The Assault Frigate "Orca's Pride" and the "Scars of Freedom" joined the Escort Frigate "Redemption" in defending the Nelvaan systems rights to free trade. They were escorted by only two X-Wing squadrons who were instructed to prevent the Imperial squadrons from having free runs at the Frigates. 

During the battle, Assault shuttles were able to dock and loot much of the supplies on the station. Even with turbolaser and ion cannon fire crippling the "Orca's Pride" and nearly destroying her, the three ships were able to overwhelm the defenses and destroy the flagship of this Imperial incursion. 

In the end, all three Frigates came out of the battle intact while most of the Imperial squadrons and the second Victory Star Destroyer were able to escape after being unable to cope with the determination and spirit of the Alliance!

This is Alliance Free News the voice of the Rebellion signing off. 

. . . nalists of greater loyalty to fill their ran. . . 

System: Nelvaan   
WINNER: Rebel Alliance  
POINTS: 300 
OBJECTIVE: Contested Outpost  

299pts REBELS: Lyraeus 

Invici Whales  (299pts) 

Assault Frigate Mark IIB (119pts) [Electronic Countermeasures (7pts), Enhanced Armament (10pts), •Mon Mothma (30pts)]

Assault Frigate Mark IIB (89pts) [Electronic Countermeasures (7pts), Enhanced Armament (10pts)]

Nebulon-B Escort Frigate (65pts) [•Redemption (8pts)]

+ Squadrons (26pts) +

X-Wing Squadron (13pts)

X-Wing Squadron (13pts)

+ Objectives +

Assault Objective [Most Wanted]

Defense Objective [Fire Lanes]

Navigation Objective [Dangerous Territory]


296pts EMPIRE: Michael
Victory II-Class Star Destroyer (126pts) [Weapons Liaison (3pts), •Grand Moff Tarkin (38pts)]

Victory II-Class Star Destroyer (88pts) [Weapons Liaison (3pts)]

+ Squadrons (82pts) +

TIE Bomber Squadron (9pts)

TIE Bomber Squadron (9pts)

TIE Bomber Squadron (9pts)

TIE Fighter Squadron (8pts)

•"Howlrunner" (16pts)

•"Mauler" Mithel (15pts)

•Major Rhymer (16pts)

+ Objectives +

Assault Objective [Advanced Gunnery]

Defense Objective [Contested Outpost]

Navigation Objective [Minefields]

So this game was honestly a luck fest for me. Early on I could not get shots to save my life and I was just spirling out of control with trying to take out the Imperial Flagship. Those of you who have seen my space whale paint job know "Orca's Pride" which was my flagship for this match. 

Alright here is how the game went. 

Turn 1 we both ambled forward. I was somewhat smart in my deployment angeling in on the outpost but later realised that it was a bad idea. It lead me to come straight on into the front arcs of the VSD's. No combat at this stage.

Turn 2 we continued forward but I while I thought I was smart (which this next part disprroves XP ) I activated my Redemption first and ran into my own flagship! Talk about silliness (I am toning it down. . . Trust me the swear words wish to be let forth. . . ) Well that left the Redemtion parked and because it was speed 1 it later in the game got out distanced and was unable to use its effect much. . . Silly me. . . 

Turn 3 is where the main combat came into play. I was able to repair the damage card on the Redemption easily enough and "Orca's Pride" just ambled on and repaired the damage. This turn I overlapped a debris with "Orca's Pride" and took the 2 damage on my port shield (which was never attacked all game except once I think). The Imperial Flagship's front arc was out of range and he was within medium range and decided to slow down to speed 0! Now to be fair he did this because "Scars of Freedom" was going to get a double arc if he moved and instead stayed in its front arc. 

"Orca's Pride" lost all front shields in that squadron phase due to being in close range of them (he had rhymer but that ust came into play), OH that was where the last port shield whent! I redirected it from the front arc to it. 

 Turn 4 came around and I start to worry that I am going to lose just from victory tokens. "Orca's Pride" begins the assault on the starboard shields of the speed 0 flagship dealing 4 damage and a critical effect!  The crit made it so that he could not ready defense tokens which was going to be useful. "Orca's Pride" then came in behind the Imperial flagship and was broadsided by both the rear and side arcs. Though no much damage was dealt. The imperial squadrons were able to strip the side and rear shields from her as well. "Scars of Freedom" was able to take down the front arc of the flagship before moving to the starboard side of it. The Redemtion is finally picking up speed and just might get some shots in!

Turn 5 comes and after being screened by "Scars of Freedom", "Orca's Pride" was able to escape the near death situiation and and dealt some damage to the Imperial flagship and by the end of the turn it was up stripped of almost all of its shields. And another damage was dealt. 

Down to the final turn! I am down to 0 points and he is up to 100! I am worried out of my mind but there is hope! Redemption is in the combat. After it delived some damage last turn it was able to deliver to finishing blow to the flagship thanks to the "Scars of Freedom" dealing 5 damage. The Flagship had no brace thanks to last tast turns combat. . . 126 points in my favor! Next the "Scars of Freedom" was able to get to the station and score my only victory token! 

Due to the skin of my teeth I was able to pull this win out but I will admit I was thinking I would lose this 100-0. . .

Thoughts?

Sunday, July 12, 2015

Rebel Fleets: Countering the Gladiator Star Destroyer

Today AFN is taking a look at fleet staragies to combat enemy commander's use of the Gladiator Star Destroyer.  As always, Yavin will be conducting this interview. 

Today we bring back Commander A and Commander B but since we are asking them for more interviews and to protect their idenity they will be known as Commander Hoth and Commander Endor.

Yavin: Good morning commanders. Todays topic is about a counter to the Gladiators deployment and actions in combat. Lets start off with Commander Hoth

Commander Hoth: Hmmm the Gladiator again. As a corvette commander I have heard of Admirals using smaller ships like the corvettes as bait. 

Commander Endor: [shudders] Talk about a think wall between you and space.

Yavin: What do you mean by that Commander Endor?

Commander Endor: A corvette relies on its speed to keep it from suffering an excessive amount of damage. When you use something as bait, it has to be something that will possibly be sacrificed. 

Commander Hoth: [nods sagely] Endor has a point there. I have done it before and limped away by the the grace of the Force. Any more damage and I would have called for the crew to abandon ship, what was left of them. . . 

Commander Endor: [pats Hoth on the back] It is war and there will always be losses.

Yavin: So using a smaller ship as bait could likely lead to the sacrifice of that ship?

Commander Endor: Against the Demolisher, almost always. With the sadistic gunners on the Demolisher and the vast array of missile launchers, she can swing in for the kill the same turn that you set the bait on the hook. 

Commander Hoth: She does not always get to enjoy her victory over the Corvette. Many commanders will use Nebulon-B's or Assault Frigates to punish the Demolisher.

Yavin: What about other Gladiators?

Commander Hoth: Well I usually see the Demolisher more ofthen than naught but there have been a few times when another Gladiator was used. The Corvette can fair better then. If your fleet commander is good, he will have you slow down as if you are trying to extend the combat and right before the Gladiator strikes he will have you jump to max speed to escape destruction. 

Commander Endor: It can be tricky to do properly, I have seen some commanders stick to middle or near max speeds and then jump the ship they think is the main target forward. This will usually lead to the Gladiator over shooting thir mark, just be careful it does it out you in their sights earlier than you want, or make sure you have the initiative and escape first. 

Yavin: Whew, that sounds dangerous, what about Nebulon-B Commander's. How can they counter the threat? 

Commander Hoth: This is a tricky one. . .  

Commander Endor: You bet your bonnet it is. The Nebulon-B has a few options. It can joust at long range but it has to be going slow for that. Just above a read stop. 

Yavin: Why would they want to do that? It sounds counter intuitive to our normal tactics. 

Commander Hoth: I see where Endor is going with this. While it sounds reversed, going slower allows you to react and you those long range Turbolasers a bit longer. 

Commander Endor: Yup, it will also let you jinx the engagement by letting you time a well done command to jump your speed up. You can save up some energy early on and then go from slow to fast in a single reaction. 

Yavin: OK, now we know that Space Whale. . .  [faces reddens], I mean the Assault Frigate can take some punishment from a Gladiator, but what improvements would you suggest. 

Commander Hoth:  Well, some Commander's like XI7 Turbolasers due to their power to limit redirected shots. 

Commander Endor: Yea, I love XI7's! Something else is enhancing the standard Armaments of good ole space whale. It will let her joust with higher levels of damage at long range. 

Yavin: Well before we end, do you have any last comments? 

Commander Hoth: Yes I do. This is a strategy to protect the Nebulon-B. You can use the Assault Frigate to guard the flank. This will protect the weaker sides of the Nebulon-B. 

Commander Endor: Well,  we covered squadron tactics pretty well last interview, but to recap them. Use them as a deterrent, if a few strong bomber squadrons can keep the Gladiator out of wanting to hit your flank all the better. You can also use slower squadrons like the B-Wing and leave them in the course of where a Gladiator will go.  

Yavin: Well that is all the time we have for today. Tune in next time.


Alliance Free News, the Voice of the Rebellion signing off.